
The decision to completely tear down an existing house and rebuild from the ground up is one of the most monumental undertakings a homeowner can experience. It is a journey that guarantees an emotional rollercoaster. In one moment, you are filled with the immense excitement of designing a floor plan tailored perfectly to your family’s lifestyle, and in the next, you are struck by the sheer terror of bulldozing a standing structure. It is an entirely normal reaction to feel overwhelmed by the magnitude of this process. While starting from a clean slate offers the ultimate freedom to avoid the constraints of an old foundation or outdated load-bearing walls, it introduces a massive logistical, legal, and financial puzzle that requires flawless sequencing to execute properly.
The reality of a complete rebuild is that success does not begin when the hammer meets the nail; it begins months, sometimes years, in advance. Without a meticulously structured roadmap, projects can easily succumb to budget overruns, delayed timelines, and regulatory nightmares. Every single step—from obtaining that very first municipal permit to installing the final piece of exterior trim—must be orchestrated with precision. A delay in the site preparation phase will inevitably cause a domino effect, pushing back the framing, which delays the roof, which ultimately leaves your raw materials exposed to the elements.
This comprehensive guide serves to illuminate that roadmap. By strategically phasing your tear-down and rebuild, you can mitigate financial risks, avoid structural headaches, and bring your dream home to life efficiently. We will journey through the five critical phases of modern home construction: site preparation and demolition, foundational framing, exterior sealing, interior climate optimization, and finally, the expansion of your living footprint into the outdoors. Understanding the intricacies of each phase will empower you to communicate effectively with your project manager and ensure your new home is built to last for generations.
Navigating the Tear-Down and Site Preparation
The first phase of rebuilding is often the most dramatic, but it is also the phase fraught with the most invisible dangers. Safely clearing a lot and prepping the earth for new construction is a highly regulated process. You cannot simply bring in a bulldozer and start knocking down walls. This stage requires careful coordination with city planners, utility companies, and environmental inspectors.
Secure Utility Disconnects and Environmental Clearances
Before a single shingle is removed or a wall comes down, the site must be entirely neutralized. This is a matter of strict legal liability and public safety. Attempting to bypass municipal protocols during this phase will result in immediate stop-work orders and severe financial penalties.
-
Mandatory Utility Disconnects: You must coordinate with local utility providers to legally and safely cap off the gas, water, and electrical lines at the street level. This process often takes several weeks of administrative back-and-forth. The utilities must be physically severed and inspected to ensure there is zero risk of an explosion, electrocution, or massive flooding during the physical teardown.
-
Hazardous Materials Assessment: Older homes are treasure troves of hazardous building materials. It is legally required in most jurisdictions to order an environmental assessment to test for the presence of asbestos (commonly found in floor tiles, pipe insulation, and siding) and lead-based paint. The results of these tests dictate exactly how the rubble must be handled, transported, and disposed of at specialized facilities.
-
Strategic Deconstruction: Rather than a chaotic smashing of the structure, consider a systematic deconstruction. Hiring experienced demolition contractors is crucial for safely bringing down the structure without damaging neighboring properties or violating noise ordinances. These professionals also know how to salvage valuable architectural elements, recycle viable materials like old hardwood flooring, copper piping, or brick, and safely transport the remaining debris to the appropriate landfills.
-
Permitting and Silt Fencing: Before heavy machinery arrives, you must have all demolition and building permits prominently displayed. Furthermore, environmental regulations require the installation of silt fencing around the perimeter of the property to prevent contaminated soil and construction runoff from washing into municipal storm drains during rainstorms.
Clear the Lot and Grade for the New Foundation
Once the old structure is completely removed, you are left with a plot of raw earth. However, this soil has been compressed and disturbed, meaning it is not yet ready to support the immense weight of a brand-new, multi-story house.
-
Protecting Mature Landscaping: If you purchased the lot specifically for the ancient oak or maple trees in the backyard, you must protect them aggressively. Set up bright, sturdy protective fencing well beyond the drip lines of any mature trees. Heavy machinery driving over the root system will compact the soil so severely that it can slowly kill a decades-old tree over the next few years.
-
Thorough Soil Testing: The soil composition of your lot dictates the type of foundation you are legally allowed to build. A geotechnical engineer should test the soil to determine its load-bearing capacity, identifying if you are building on stable clay, shifting sand, or solid bedrock.
-
Professional Earth Moving: Digging a new foundation is a game of millimeters. Bringing in professional excavation services is necessary to dig the new footprint to the exact depths required by the local frost line. If the foundation does not sit below the frost line, the seasonal freezing and thawing of the earth will heave the entire house upward, shattering the concrete.
-
Establishing Drainage Swales: The raw dirt must be meticulously graded before the concrete is poured. The earth should be shaped to naturally direct groundwater and future rainfall away from where the new basement or crawlspace will sit, preventing subterranean flooding before the house even exists.
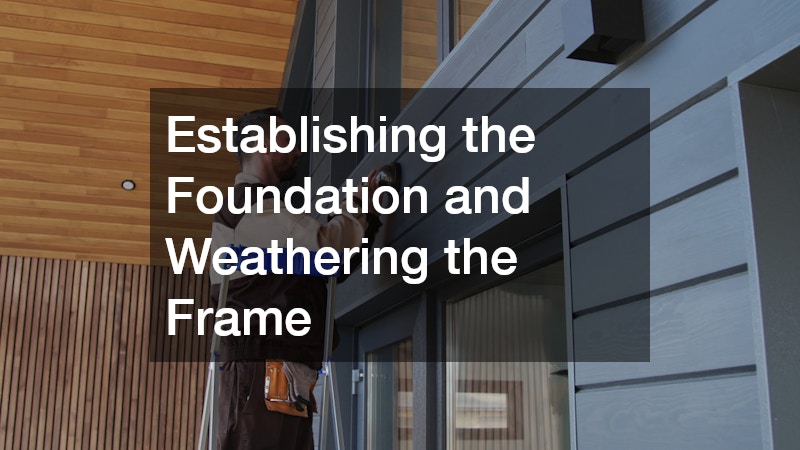
Establishing the Foundation and Weathering the Frame
With the earth prepared, the true construction begins. Getting the house out of the ground and building its wooden skeleton is incredibly exciting because you finally see the three-dimensional shape of your future home. However, this phase is a race against time and the elements.
Pour a Solid Base and Plan Your Hardscape Features
The foundation is the most unforgiving part of any construction project. If a framing stud is slightly crooked, it can be replaced. If a foundation is poured out of square or without the proper structural reinforcements, it compromises every single floor, wall, and roof truss above it.
-
Choosing the Right Foundation Type: Depending on your soil tests and local water table, you will pour a slab-on-grade, a ventilated crawlspace, or a full basement. Each requires intricate formwork, heavy steel rebar reinforcement, and precisely calculated concrete mixtures to achieve the required compressive strength.
-
The Critical Curing Process: Concrete does not “dry”; it cures through a chemical reaction that requires specific temperature and moisture conditions. It is imperative to let your newly poured concrete foundation cure for at least a week before the heavy lumber framing begins. Rushing this step will result in micro-cracking under the sheer weight of the house.
-
Advanced Waterproofing: Do not rely solely on standard builder-grade tar to waterproof a basement. Demand the installation of high-quality dimple boards and specialized elastomeric waterproofing membranes on the exterior foundation walls, coupled with a robust perimeter perimeter drain tile system encased in washed gravel.
-
Integrating Specialized Architecture: If your architectural plans call for specialized brick foundations, intricate stone chimneys that run from the basement to the roofline, or complex retaining walls to manage a sloped lot, engaging a custom masonry contractor early in this phase is vital. These heavy structural elements must be tied directly into the concrete foundation footings before the wooden framing gets in the way.
Seal the Top Quickly to Protect the Wood Framing
The framing phase, where the walls and roof trusses are erected, happens surprisingly fast. However, raw lumber, oriented strand board (OSB), and engineered floor joists are highly vulnerable to water. The absolute highest priority of the framing stage is getting the house “dried in.”
-
Sheathing and House Wrap: As soon as the exterior walls are framed, they must be sheathed in plywood or OSB and immediately covered with a weather-resistant barrier (commonly known as house wrap). This prevents rain from soaking into the vulnerable end-grains of the wood.
-
Aggressive Eave Protection: The edges of the roof are highly susceptible to water damage, particularly in cold climates where ice dams can form, forcing water back up under the shingles. Demand the installation of a self-adhering ice and water shield membrane along all roof eaves, valleys, and penetrations before the primary roofing material is even delivered to the site.
-
Securing the Canopy: Once the roof decking is nailed down, coordinating promptly with reliable roofing companies ensures that the wooden skeleton is protected from impending rain and moisture. Getting the synthetic underlayment and final shingles, metal panels, or tiles installed rapidly prevents catastrophic mold growth and framing rot before the interior insulation and drywall processes begin.
-
Installing Windows and Doors: The final step to drying in the house is installing the windows and exterior doors. The flashing tape applied around these openings must be meticulously layered to ensure that wind-driven rain is shingled outward, completely sealing the home’s envelope.

Installing High-Performance Exterior Cladding and Access Routes
Once the home is dried in and protected from the sky, the focus shifts to the exterior skin and the functional access routes that connect your home to the street. This phase is where the aesthetic personality of your new home truly emerges, but every cosmetic choice must be backed by rigorous building science.
Wrap the House in Durable, Moisture-Resistant Materials
The exterior cladding of your home takes a daily beating from ultraviolet radiation, driving rain, snow accumulation, and even impacts from hail or debris. The materials you choose will dictate your maintenance schedule for the next three decades.
-
The Rain Screen Principle: Modern building science dictates that siding should never be installed flush against the weather-resistant barrier. Utilize “rain screen” principles by installing vertical furring strips before applying exterior boards. This leaves a small, critical air gap between the barrier and the cladding so any trapped moisture can easily evaporate or drain away safely to the ground.
-
Evaluating Cladding Options: You must weigh the pros and cons of different materials. Vinyl is cost-effective but can become brittle in extreme cold. Traditional wood clapboard is beautiful but requires constant painting and rot-prevention. Fiber cement board and engineered wood products offer incredible durability, fire resistance, and immunity to termites, though they require specialized cutting tools and heavy lifting to install.
-
Precision Flashing: The most common point of failure on any home’s exterior is not the siding itself, but the areas where the siding meets windows, doors, and rooflines. Working with specialized siding contractors guarantees that the complex metal Z-flashing and step flashing are installed flawlessly in these vulnerable transition zones, preventing the insidious, hidden water intrusion that rots the structural framing from the inside out.
-
Caulking and Sealing: Every butt joint, corner board, and window perimeter must be sealed with high-grade, exterior polyurethane caulk that can flex with the seasonal expansion and contraction of the building materials.
Establish Proper Drainage for Driveways and Walkways
The approach to your home is not just for curb appeal; it is a massive, impermeable surface that must be managed. A poorly installed driveway will funnel thousands of gallons of water directly into your brand-new garage or foundation.
-
Timing the Heavy Machinery: The timeline for exterior flatwork is critical. You must ensure that all heavy machinery—such as telehandlers, boom lifts, and heavy delivery trucks—are completely finished operating on the property before driveways and walkways are poured or paved.
-
The Sub-Grade Pitch: Just like your foundation, your driveway requires a meticulously graded dirt base. Ensure the sub-grade for your driveway is pitched at least two percent away from the garage doors and foundation walls before the base layer is ever applied.
-
Building a Solid Base: A driveway is only as strong as what lies beneath it. It requires a thick, heavily compacted layer of crushed stone to provide a stable, load-bearing foundation that will not shift or sink over time.
-
Final Surface Application: Whether you choose concrete or a flexible bituminous surface, the installation requires ideal weather conditions and heavy rolling equipment. Discussing your project with professional asphalt services ensures the application of a properly compacted surface that will resist the harsh freeze-thaw cycle, effectively shedding water without cracking or developing deep potholes.

Optimizing Indoor Comfort and Climate Control
With the exterior sealed, the interior work begins in earnest. Behind the walls lies the complex nervous system and respiratory tract of your new home. Skimping on the insulation or climate control infrastructure during a rebuild will permanently compromise the comfort of the house and chain you to exorbitant energy bills for years.
Create a Thermal Break to Slash Energy Bills
Insulation does more than just keep you warm in the winter; it keeps the blistering heat out during the summer. Creating an airtight building envelope is the single most effective investment you can make in a new build.
-
Understanding Thermal Bridging: Heat naturally moves through solid wood studs much faster than it moves through insulated cavities. This is called thermal bridging. To combat this, advanced building techniques often involve applying a layer of rigid foam board on the exterior of the framing before the siding goes on, essentially wrapping the home in a continuous thermal blanket.
-
Targeting Heat Loss Zones: Focus heavily on sealing the rim joists (the area where the wooden floor framing meets the concrete foundation) and the attic floor. These are the two primary areas where the most dramatic heat loss and air infiltration occur in a home due to the stack effect.
-
Choosing the Right Material: Fiberglass batts are inexpensive but prone to leaving air gaps if not installed perfectly. Blown-in cellulose is excellent for attics. However, closed-cell spray foam provides the ultimate barrier, as it expands to fill every crack and crevice while simultaneously acting as a vapor barrier and adding structural rigidity to the walls.
-
Professional Application: Because modern building codes require strict adherence to specific R-values (thermal resistance), relying on certified insulation contractors is critical. They possess the specialized equipment required to mix chemical spray foams at the precise temperature and apply them evenly, creating an airtight seal that slashes your long-term carbon footprint.
Size Your Heating and Cooling Systems Accurately
The mechanical systems in a modern home are highly advanced. Putting an oversized or undersized furnace into a tightly insulated new build will cause massive humidity issues, uncomfortable temperature swings, and premature equipment failure.
-
Demand a Manual J Calculation: Never let a professional guess your heating and cooling needs based solely on the square footage of the house. That is an antiquated rule of thumb. You must demand a strict “Manual J load calculation.” This complex mathematical formula accounts for your home’s exact window placement, the quality of your insulation, the direction the house faces, ceiling heights, and your specific local climate zone.
-
Designing the Ductwork: The lungs of your house are the ducts. They must be designed for optimal aerodynamic flow. This means minimizing sharp 90-degree turns and using rigid metal ducting wherever possible rather than flexible plastic tubes, which impede airflow.
-
Strategic Sequencing: The installation of this infrastructure requires careful timing. Vetted HVAC contractors must design and install the bulky ductwork layout, the return air vents, and the furnace location before the electrical wiring and plumbing pipes crowd the joist bays, and certainly long before the drywall goes up.
-
Modern Climate Technology: A rebuild is the perfect time to abandon outdated technology. Integrate smart thermostats, zoned temperature controls with electronic dampers, and high-efficiency variable-speed heat pumps. These systems learn your living habits and adjust the climate room-by-room, ensuring pristine indoor air quality and unmatched comfort.

Expanding Square Footage with Outdoor Living Spaces
The final phase of a complete home rebuild is seamlessly blending the interior comforts with the natural environment outside. The modern architectural philosophy views the backyard not just as a lawn, but as a direct extension of the living room, kitchen, and entertainment areas.
Design Structural Supports for Exterior Entertainment Areas
An outdoor living space is a major structural addition. It must be engineered to hold the massive weight of furniture, outdoor kitchens, accumulated snow, and large gatherings of people without shifting or pulling away from the main house.
-
The Critical Ledger Board: The most dangerous point of failure for an elevated outdoor space is where it attaches to the house. Always ensure the ledger board is attached directly to the home’s solid structural framing—never just screwed into the exterior cladding.
-
Utilizing Structural Hardware: Standard carpentry nails should never be used for heavy outdoor load-bearing connections. Demand the use of heavily galvanized structural screws, through-bolts, and metal joist hangers to prevent the wood from splitting and to eliminate the risk of a catastrophic deck collapse.
-
Engineering for Heavy Amenities: If you envision a large outdoor kitchen with a stone pizza oven or a sunken hot tub, standard framing is severely inadequate. You must rely on the structural expertise brought by specialized deck builders, who understand how to calculate dead loads, decrease joist spacing, and pour oversized concrete footings to handle these massive, concentrated weights.
Select Materials Based on Long-Term Maintenance Capacity
The allure of a beautiful outdoor space quickly fades if you are forced to spend every summer weekend sanding, staining, and replacing warped boards. Material selection here is just as critical as your interior flooring.
-
Evaluate Your Maintenance Tolerance: Weigh your tolerance for weekend chores honestly. If you enjoy the rustic look of natural wood and don’t mind the rigorous upkeep, natural cedar or pressure-treated pine are excellent choices. However, if you hate power-washing and restaining, bypass wood entirely in favor of high-performance PVC or composite boards that resist fading, scratching, and moisture penetration.
-
Hidden Fastening Systems: To maintain a clean, modern aesthetic and prevent water from pooling in screw holes, request hidden fastening systems where the clips are installed into the grooves on the sides of the boards, rather than drilling directly through the top face.
-
Navigating Zoning and Safety Codes: Outdoor structures are heavily regulated. Consulting with experienced deck contractors can help you navigate local zoning laws regarding property line setbacks. Furthermore, they will ensure that staircase rise-and-run dimensions, graspable handrails, and baluster spacing strictly adhere to building codes, guaranteeing your new outdoor oasis is both stunning to look at and legally compliant.
Conclusion
Tearing down an old structure to rebuild a custom home is not merely a heavy construction project; it is a complex, long-term orchestration of legal permits, heavy machinery, environmental management, and precise building science. It requires patience, significant financial resources, and the ability to make hundreds of decisions under pressure. However, the payoff for navigating this labyrinth is unparalleled. You are rewarded with a custom-tailored sanctuary built precisely to your family’s unique lifestyle needs, fortified with modern safety standards and cutting-edge energy efficiency that an older home simply cannot match.
As you embark on this massive undertaking, remember the golden rule of construction: always prioritize the structural integrity and the hidden “bones” of the house over the cosmetic finishes. You can easily swap out kitchen cabinets, change the paint colors, or upgrade a bathroom vanity a decade from now, but a poured concrete foundation and the wooden skeleton of your home are forever. Allocate your budget heavily toward the site prep, the framing, the exterior envelope, and the insulation.
Do not wait until the old house is demolished to start planning. Begin assembling your dedicated team of architects, project managers, and specialized tradespeople months in advance. By thoroughly vetting your team, adhering strictly to the structured phasing of the build, and maintaining open lines of communication, you can confidently embrace the challenging, rewarding journey of building your legacy from the ground up.